
13 Jan How to Create a High-quality Business Report with MaxPrint for Oracle APEX
Are you looking for a premium quality business report for your Oracle APEX application? Are you worried about how to get a fully secure printing solution that also supports email functionality? If so, count MaxPrint in!
Getting a business report that can integrate with the Oracle APEX environment can be a hassle. Business reports play a crucial role in representing your professionalism and performance. Especially, when these solutions are complex to set up. Such as Jasper report or BI publisher.
MaxPrint is the answer to all your problems. It has free and low-cost versions that provide pixel-perfect business reports. These reports can be printed in HTML, PDF, or Docx forms. You can start from a free version and then switch to any low-paying version.
The great news is you don’t need to burn your buns off to get this incomparable business report. It is a simple three-step procedure that won’t take your whole day.
Let’s dive into a step-by-step guide to learn generating the finest reports with MaxPrint.
Step 1: Installing MaxPrint Plugin to Your APEX Application
Simply upload the installation file in the Oracle APEX Application.
- Log in to your Oracle APEX workspace
- Next click on the SQL Workshop option
- After tapping you’ll see a drop-down menu
- Tap on SQL scripts
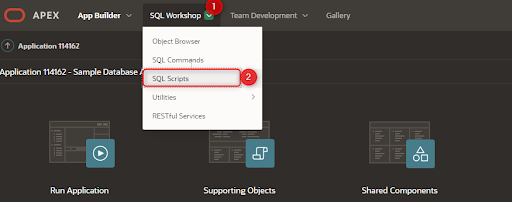
After that, upload the install.sql file and press the Run button.


Next, you’ll get an option to upload the script.
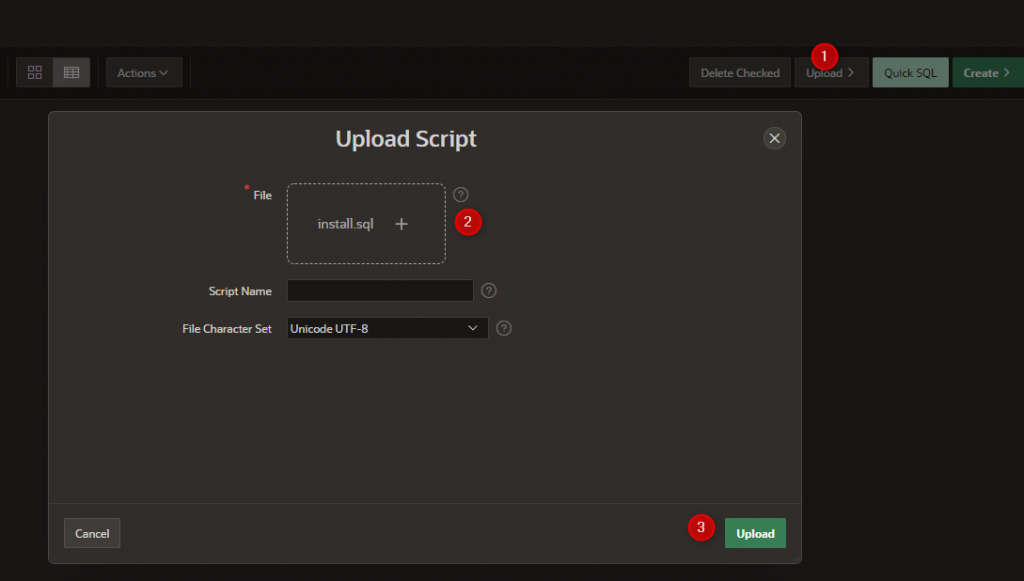
After uploading the file, you’ll get an option to ‘Run’ the script.

You can see in the above picture that the red arrow is headed towards the Run option.
After that, you’ll get the following result.
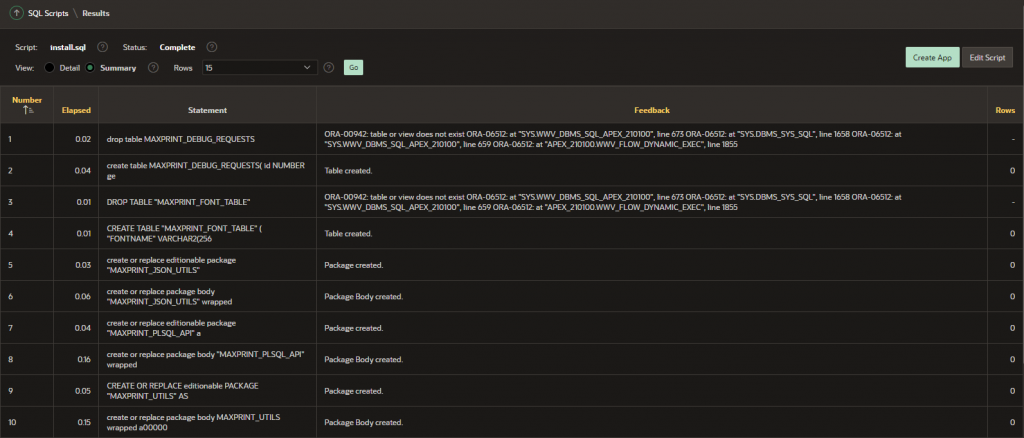
Your next step would be getting into your installation folder and importing the file dynamic_action_plugin_com_MaxPrint.sql as a plugin in your Oracle APEX.
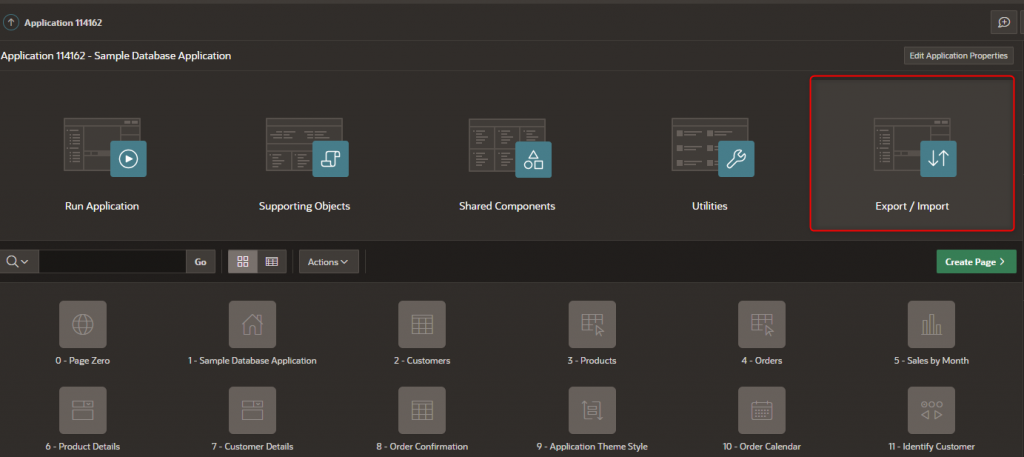
Now install the file named dynamic_action_plugin_com_MaxPrint.sql from the installation folder.
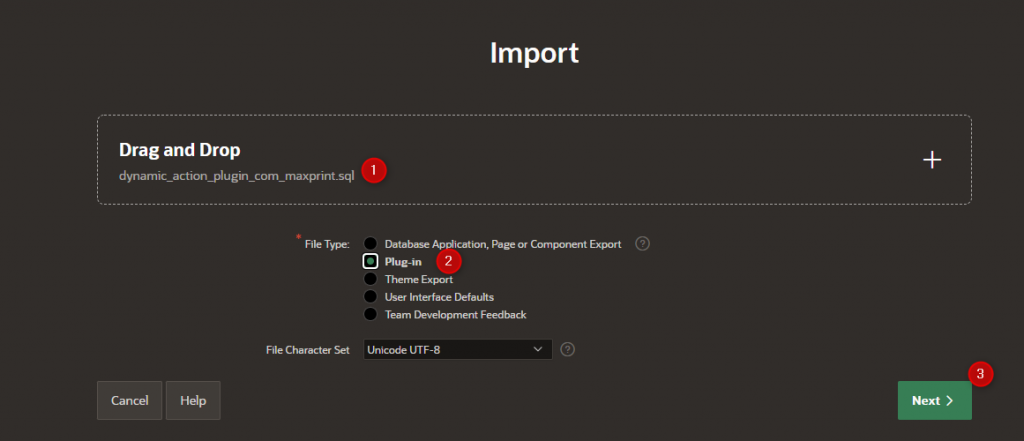
Now that your plugin has been installed, it’s time to start using the MaxPrint!
Just add in the API key and http link and you’re ready to create your first business report. However, please note that you require MSWord or LibreOffice editor latest and Oracle APEX 18+ for the installation of this plugin.
After installing the plugin, the next step is writing down the SQL. Hover downwards to learn about that.
Step 2. Write SQL for Your Business Report
The great news is that you can design your business report on a windows document. You can customize it as you want your data to be displayed.
For your assistance, here is an example template:

You don’t need to follow the same pattern. You can build your business report from scratch. However, you do require a schema along with tables for the data display.
Regardless, we do provide a schema table objects that are represented in the order given below:
Report template language
DEMO_ORDER_ITEMS
DEMO_PRODUCT_INFO
DEMO_ORDERS
DEMO_CUSTOMERS
The keywords you would require are:
Report :
{#report} this is the report start tag
{/report} this is the report end tag
You can use these to start and end your template region
Query column name :
Here you can add the column name of your query.
Details :
{#details}: use this tag as the opening detail tag in your template region.
{/details} : utilize this as the closing detail tag.
Please note that you can only use this tag when your business report is a simple SQL.
Label :
You can add words as per your preference in the template. You will see them displayed without any alteration.
Query cursor name tag:
Let’s give you a supposed demonstration that your report consists of your client’s data:
If your cursor name is client, you will use {#client} as the open tag and {/client} as the close tag. This means that if your report query utilizes any cursor, the name of the cursor would be used as the end and start tag in the template.
pageBreakExceptLast:
Over query row, you can break the report page conveniently.
Company logo:
You can also add an image to the template. It can be any relevant chart or company logo.
Column name:
You can also write down the query column name.
Please have a look at the template given above in case of any confusion.
Now that you know how to write SQL, you can easily create a report as per your needs. For that, you need to follow the next step.
Step 3. Generate Your Business Report Template Using MS Word
- Go to your docx file
- Create the template
- Save it on your desktop
Once you’re done, repeat the following steps for uploading the document in your Oracle Apex Workspace.
- Oracle Application > Shared component
- Look under the Files section > Tap on static application files
- Tap on the upload file > Select saved Docx template
- Copy the document name

- Another option can be generating a template from your query
- Generate a MaxPrint Dynamic Action on a button
- Go to setting action > Tap on generate the template
- Run your Apex page > click on the button for template generation
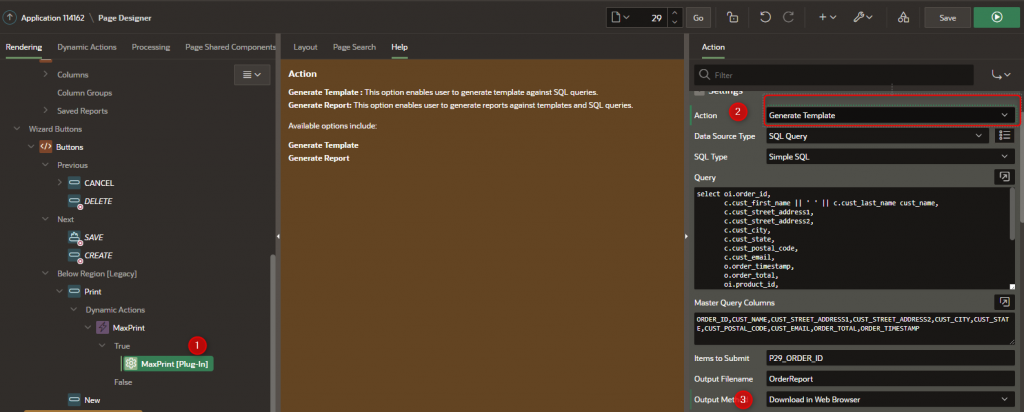
You should get something like this:

MaxPrint , easy-to-use APEX plugin that enables users to create stunning PDF, Dockx, and HTML reports
That’s it! You can customize the logo, color, and organize the label positions as per your choice. After modification, you can upload Oracle Apex for generating future reports.
Now that your report is created, the next thing you need is to print it. Scroll down to know the available printing actions.
How to Print Your Business Report
Here are two ways you can print your report
- Onload process
- On button click
For the above-given example, we will use the second option.
For the click on a button option:
- Action: MaxPrint[Plug-In]
- Setting Action: Generate Report
- Template Source: APEX Static Files Directory
- Template File Name: OrderTemplate.docx
- Template File Type: Docx
- Data Source Type: SQL Query
- SQL Type: Simple SQL
- Query: Enter your query here.
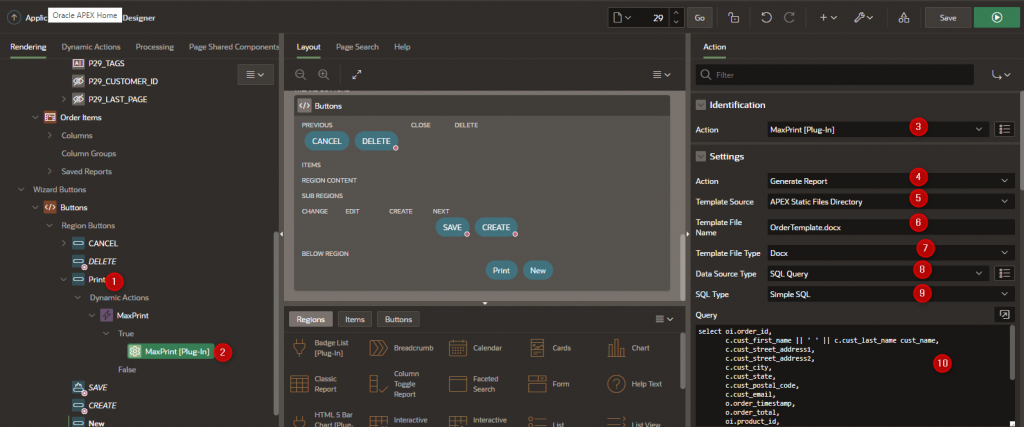
Three types of Queries are supported by MaxPrint:
- Simple SQL
- Cursor based SQL
- JSON Object SQL
You can see the SQL query example below for the MaxPrint plugin.

Items to submit: incase you query use any item, add the name of the item over here. In the present case, the query has used the order id item (P29_ORDER_ID) that we require printing. Therefore, submitting this item in the APEX is crucial on the server side. This is the cause why we have it in the “item to be submit” category.
OutPut Type: pdf
Master Query Columns: Here you can list all query columns.
Output Method: open in a web browser.
Output Filename: the output filename. You can add any name.

Execution
After clicking on the print button, you’ll get the result below:
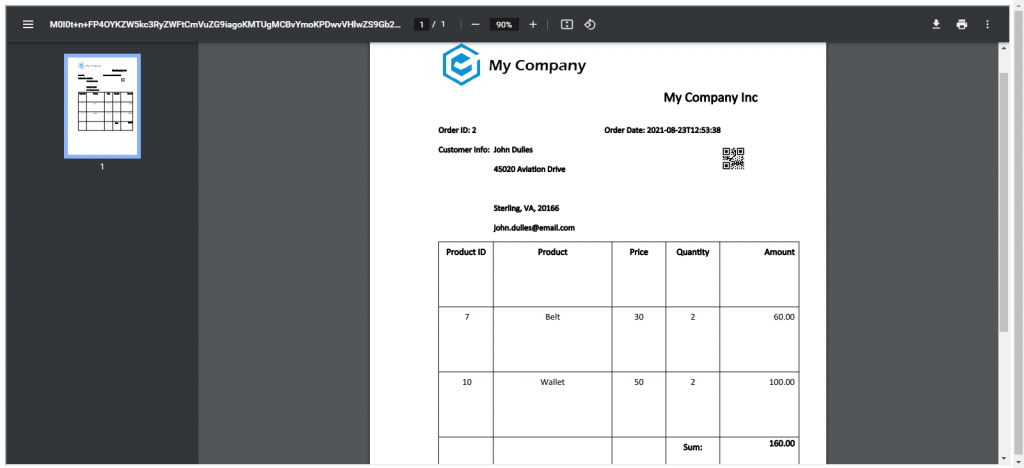
Final word:
Now that you have gone through MaxPrint’s report generation process, you can get your business reports within a snap! So, what are you waiting for? get outstanding quality reports today!


No Comments