
One of the most common requirements in business reporting is the Group Above format. Think of invoices, purchase orders, or shipment manifests where a single header (Customer Info) is followed by multiple detail rows (Order Items).
Today, we’re diving into how to master this using MaxPrint V2, the premier Oracle APEX Reporting Tool.
The Secret Sauce: Structured Data
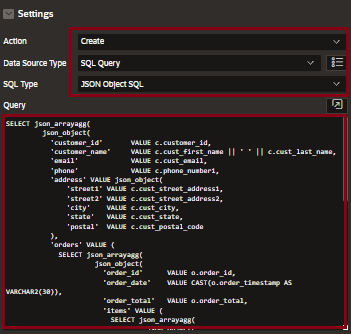
Before we touch the UI, we need to talk about the data. MaxPrint V2 thrives on structured data. Instead of only flat tables, we also use JSON Object SQL. This allows us to nest our “items” directly inside our “customer” records.
The SQL Foundation
Here is the query structure that powers our report. Notice how we use JSON_ARRAYAGG to nest the order items within each customer record:
SELECT json_arrayagg(
json_object(
‘customer_name’ VALUE c.cust_first_name || ‘ ‘ || c.cust_last_name,
’email’ VALUE c.cust_email,
‘order_id’ VALUE o.order_id,
‘order_total’ VALUE o.order_total,
‘items’ VALUE (
SELECT json_arrayagg(
json_object(
‘product_name’ VALUE p.product_name,
‘unit_price’ VALUE oi.unit_price,
‘quantity’ VALUE oi.quantity,
‘line_total’ VALUE (oi.unit_price * oi.quantity)
)
ORDER BY oi.order_item_id
)
FROM demo_order_items oi
JOIN demo_product_info p ON oi.product_id = p.product_id
WHERE oi.order_id = o.order_id
)
)
) AS customer_invoices
FROM demo_customers c
JOIN demo_orders o ON c.customer_id = o.customer_id;
Step 1: Initiating the Design
Once your SQL is ready, the integration in APEX is seamless.
1. Create your Trigger: Drop a button on your APEX page (e.g., “Generate Report”).

2. Add a Dynamic Action: Set the action to the MaxPrint_V2 plugin.

3. The “Create” Phase: Set the plugin action to Create, data source type to SQL Query and SQL Type as JSON Object SQL and paste your query in Query section.
When you run the page and click that button, you’ll be whisked away to the MaxPrint Designer—a drag-and-drop environment that feels more like a creative suite than a coding IDE.
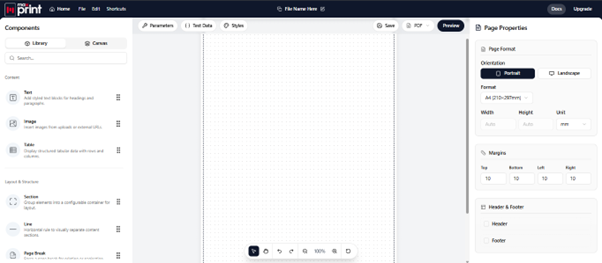
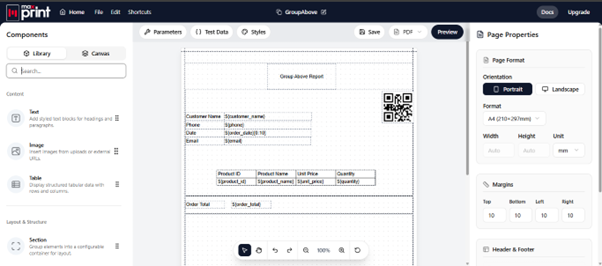
Step 2: Designing the “Group Above” Layout
In the Designer, the real magic happens. To get that “Group Above” look, follow this hierarchy:
- The Section: Drag a Section element onto the canvas. This acts as the repeating container for each “Group.” Bind this section to your top-level data (the customer details).
- The Header: Place Text elements for Heading, Customer Name, Phone and Order ID at the top of the section.
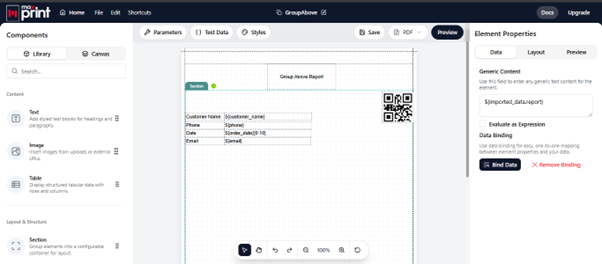
- The Details (The Table): Drag a Table element inside the section. Bind the table to the items array from your JSON. This ensures that for every customer, a table of their specific items is rendered right below their info.
- After that design the rest of the template as shown and this will be the template you will have at the end.
Pro-Tip: Use the Preview button frequently! It allows you to see exactly how your data maps to the design in real-time.
Step 3: The Iterative Cycle (Editing Your Template)
Rarely is a report perfect on the first click. Sometimes you need make some changes in the report design like add/remove a field from your report. One of MaxPrint’s most powerful features is the ability to jump back into a saved report template to tweak layouts or add an element.
Saving your Template ID
Once you’ve done your initial layout in the Designer, look for the Template ID next to the template name. Copy this ID. This is the “key” to your report.
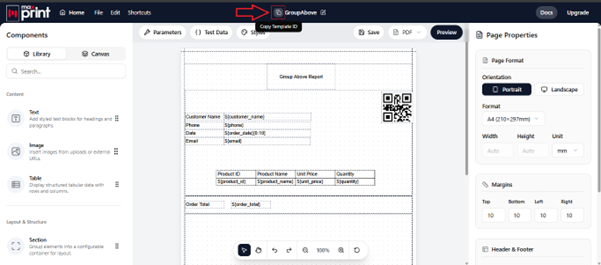
Switching to Edit Mode
To make changes to an existing report, head back to your Oracle APEX Dynamic Action and update the settings:
- Action: Change from “Create” to “Edit”.
- Template Source: Select Template ID.
- Template ID: Paste the ID you copied earlier.

Now, whenever you click your APEX button, it won’t start a new report—it will open your existing report template in the Designer, allowing you to refine styles, adjust column widths, or update data bindings effortlessly.
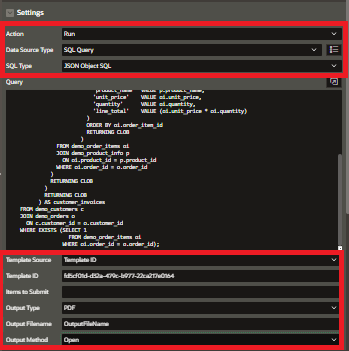
Step 4: Deployment and Generation
Once your design is ready, it’s time to bring it back into your application.
- The Handshake (Linking the Template)
Every template you build in MaxPrint has a unique Template ID. Copy this ID. Back in Oracle APEX, update your Dynamic Action:
- Change the Action from Create to Run.
- Paste your Template ID.
- Choosing Your Output
MaxPrint is flexible. PDF is the gold standard for reports generation. You can specify the filename and the output method such as Download for downloading file and Open for immediate access of report in browser.
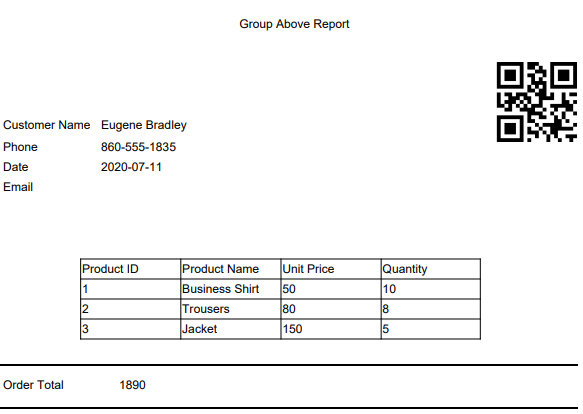
The Result
Click the button, and within seconds, you have a professional, grouped PDF report that handles page breaks, nested totals, and complex layouts effortlessly.
MaxPrint V2 turns the “reporting nightmare” into a streamlined, visual workflow. Whether you’re building simple lists or complex multi-level invoices, the “Group Above” logic remains the same: Smart SQL + Visual Binding = Beautiful Reports.
Why This Workflow Matters
The “Create → Edit → Run” workflow in MaxPrint V2 gives developers the best of both worlds:
- Technical Precision: Complex SQL-driven data grouping.
- Creative Freedom: A visual designer that doesn’t require coding knowledge.
- Seamless Iteration: The ability to jump back into “Edit” mode ensures that as business requirements change, your reports can keep up.
Ready to try it yourself?
Whether you are a reporting veteran or just starting to explore options for Oracle APEX, designing your reports with MaxPrint V2 is a game-changer. By moving beyond traditional, rigid reporting methods and embracing MaxPrint’s intuitive drag-and-drop designer, you’ll find that your data binding becomes cleaner, your templates more flexible, and your final reports more professional than ever.
Happy Reporting!